JAMES LEE''s BLOG


  • 首页

  • 归档

Machine Learning Performance Indicators

发表于 2018-09-15

机器学习中最基本的问题就是二元分类问题和回归问题。你如果设计了一个分类模型或者回归模型,如何刻画你这个模型的好坏呢?就要用到这些性能指标了。

分类

最基本的分类是二元分类,就是说数据输入你的模型,你告诉人家这是某种object还是不是。分类,必然存在正确的情形,也存在错误的情形。对于二元分类,就是说,正确的情形包括正类预测为正类,负类预测为负类;错误的情形当然包括将正类预测为负类,将负类预测为正类。学术界用混淆矩阵刻画这个结果:

混淆矩阵
True Positive(真正, TP):将正类预测为正类数.
True Negative(真负 , TN):将负类预测为负类数.
False Positive(假正, FP):将负类预测为正类数 误报 (Type I error).
False Negative(假负 , FN):将正类预测为负类数 漏报 (Type II error).
为什么称之为矩阵呢?因为经常这样记录这四个数:
|   | positive | negative |
| :—–: | :——: | :——: |
| True | True Positive(TP) | True Negative(TN) |
| False | False Positive(FP) | False Negative(FN) |
在这个混淆矩阵基础上,产生了几个性能指标:

准确率(Accuracy)

$$ACC=\frac {TP+TN}{TP+TN+FP+FN}$$

在正负样本不平衡的情况下,准确率这个评价指标有很大的缺陷。比如在互联网广告里面,点击的数量是很少的,一般只有千分之几,如果用acc,即使全部预测成负类(不点击)acc 也有 99% 以上,没有意义。

精确率(Precision)

$$P={TP \over TP+FP}$$

召回率(Recall)

有的文献称之为sensitivity,true positive rate
$$R=\frac {TP}{TP+FN}$$

在信息检索领域,精确率和召回率又被分别称为查准率和查全率。
$$查准率=\frac{检索出的相关信息量}{检索出的信息总量}, 查全率=\frac{检索出的相关信息量}{系统中的相关信息总量}$$

F1值(F1 Score)

精确率和召回率的调和均值。所谓调和均值,就是倒数平均数,是总体各统计变量倒数的算术平均数的倒数。看公式:
$${2 \over F_1}={1 \over P} + {1 \over R} $$
可以很容易推出:
$$F_1={2PR \over {P+R}}={2TP \over {2TP+FP+FN}}$$

精确率和准确率都高的情况下,F1 值也会高。

PR曲线

PR曲线指Precision-Recall曲线,中文为查准率-查全率曲线。

对于一个分类器(也就是一种分类算法啦),可以给出每个样本属于正类的概率。你可以选择一个阈值,将概率大于这个阈值的归为正类,其他归为负类。因此,一个阈值对应一个划分,也就对应一个(Recall,Precision)pair。选择不同的阈值,得到很多的pairs。在Recall-Precision坐标系,一个pair对一个点,把这些点连接起来就构成PR曲线。
Precision-Recall-Curve
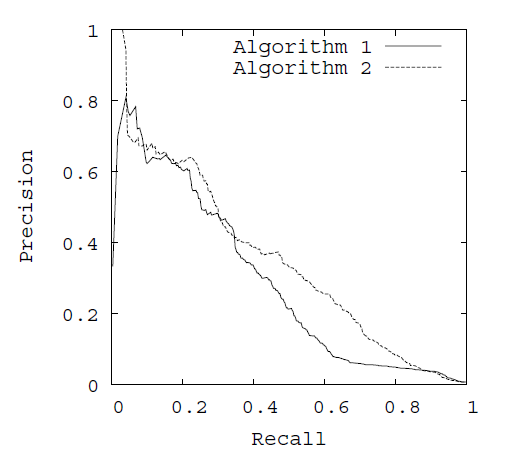
通常随着分类阈值从大到小变化(大于阈值认为属于正类),查准率减小,查全率增加。比较两个分类器好坏时,显然是查得又准又全的比较好,也就是的PR曲线越往坐标(1,1)的位置靠近越好。

ROC 曲线

先讨论几个指标:TPR,FPR,TNR
(1) TPR(True Postive Rate)
真正类率,代表分类器预测的正类中实际正实例占所有正实例的比例,也就是前文中的Recall。有的文献称为敏感度(Sensitivity)。
$$TPR=\frac {TP}{TP+FN}$$
(2) TNR(True Negative Rate)
真负类率,代表分类器预测的负类中实际负实例占所有负实例的比例,又称为特异度(Specificity)
$$TNR=\frac {TN}{FP+TN}$$
(3) FPR(False Postive Rate)
假正类率,代表分类器预测的正类中实际负实例占所有负实例的比例。1-Specificity
$$FPR={FP \over FP+TN}$$

显然,TNR+FPR=1。

ROC-curves
正如我们在这个ROC曲线的示例图中看到的那样,ROC曲线的横坐标为false positive rate(FPR),纵坐标为true positive rate(TPR)。

我们讨论ROC曲线图中的四个点和一条线。

  • 第一个点,(0,1),即FPR=0, TPR=1,这意味着FN(false negative)=0,并且FP(false positive)=0。Wow,这是一个完美的分类器,它将所有的样本都正确分类。
  • 第二个点,(1,0),即FPR=1,TPR=0,类似地分析可以发现这是一个最糟糕的分类器,因为它成功避开了所有的正确答案。
  • 第三个点,(0,0),即FPR=TPR=0,即FP(false positive)=TP(true positive)=0,可以发现该分类器预测所有的样本都为负样本(negative)。
  • 第四个点(1,1),分类器实际上预测所有的样本都为正样本。
  • ROC曲线图中的虚线y=x上的点。这条对角线上的点其实表示的是一个采用随机猜测策略的分类器的结果,例如(0.5,0.5),表示该分类器随机对于一半的样本猜测其为正样本,另外一半的样本为负样本。

经过以上的分析,我们可以断言,ROC曲线越接近左上角,该分类器的性能越好;PR曲线越接近右上角,该分类器性能越好。

那么是怎么得到这个曲线的呢?
对于一个特定的分类器和测试数据集,显然只能得到一个分类结果,即一组FPR和TPR结果,而要得到一个曲线,我们实际上需要一系列FPR和TPR的值,这又是如何得到的呢?其实这和得到PR曲线一个原理。

有一个视频讲这个讲得特别好。推荐一下,ROC Curves and Area Under the Curve(AUC) ,如果上不了YOUTUBE,可以去看看视频末尾提到的这个网站ROC-Visualization。

大概原理是这样的。假如你已经有了一个模型,你就可以根据这个模型得到了所有样本的概率输出(属于正样本的概率)。ROC-Probability-Model
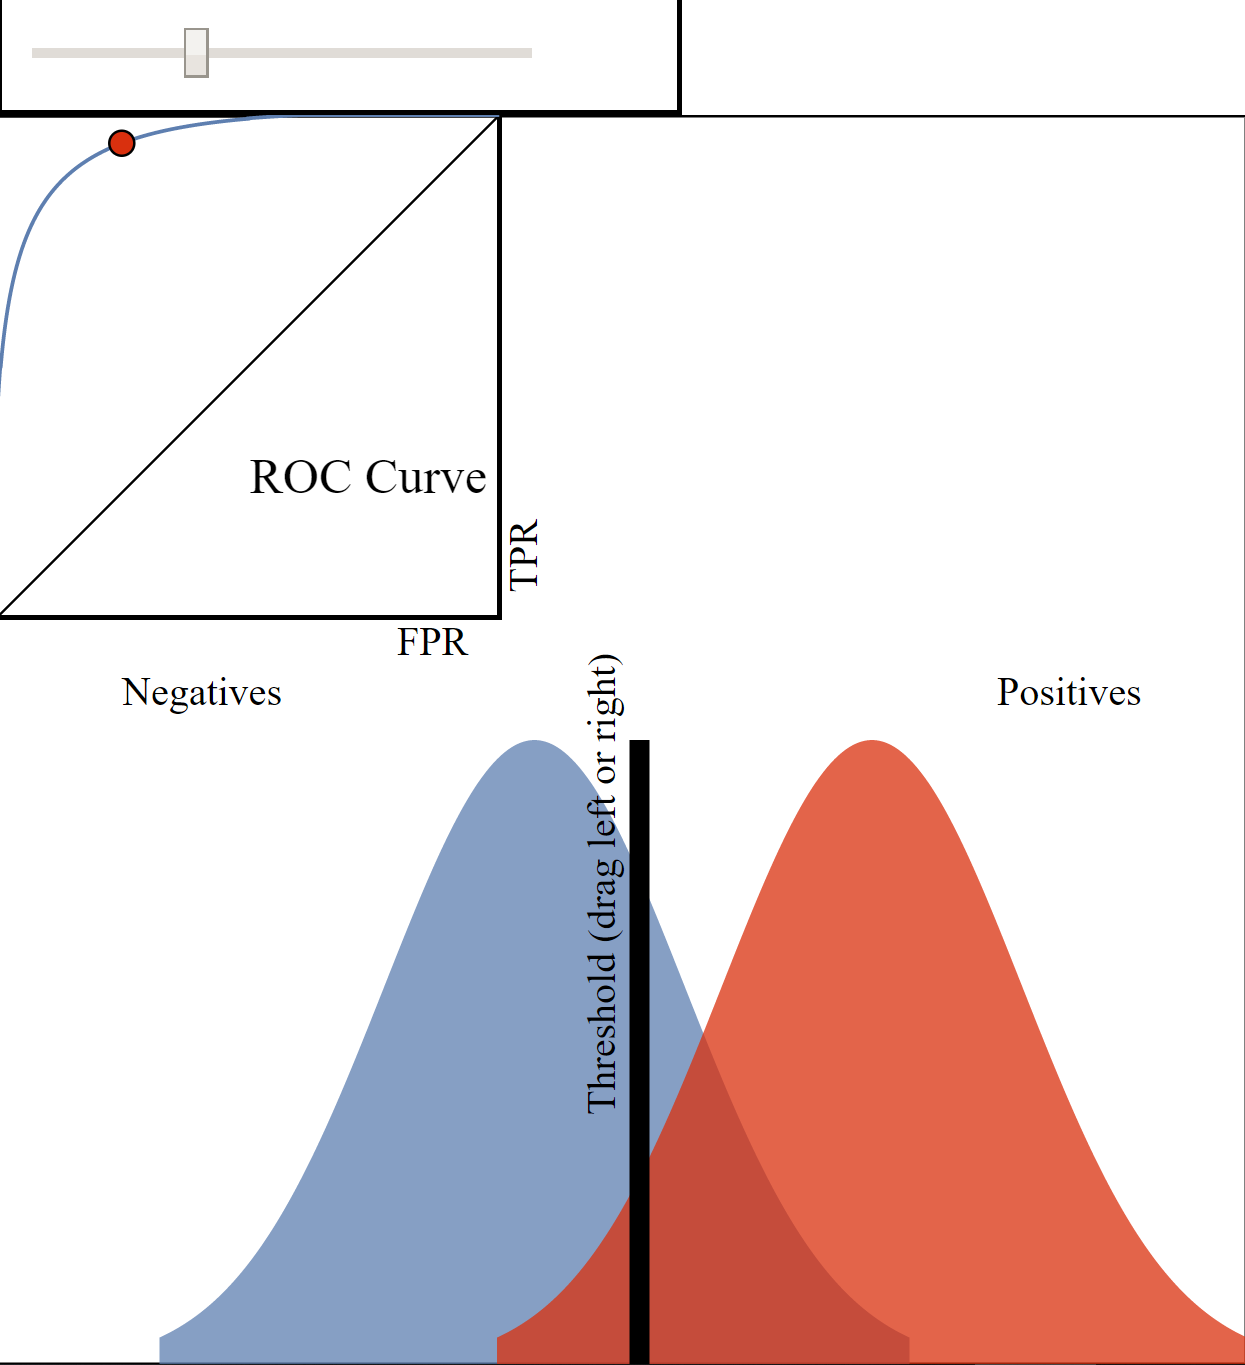
现在的问题是如何改变“discrimination threashold”?我们根据每个测试样本属于正样本的概率值从大到小排序。下图是一个示例,图中共有20个测试样本,“Class”一栏表示每个测试样本真正的标签(p表示正样本,n表示负样本),“Score”表示每个测试样本属于正样本的概率。


接下来,我们从高到低,依次将“Score”值作为阈值threshold,当测试样本属于正样本的概率大于或等于这个threshold时,我们认为它为正样本,否则为负样本。举例来说,对于图中的第4个样本,其“Score”值为0.6,那么样本1,2,3,4都被认为是正样本,因为它们的“Score”值都大于等于0.6,而其他样本则都认为是负样本。每次选取一个不同的threshold,我们就可以得到一组FPR和TPR,即ROC曲线上的一点。这样一来,我们一共得到了20组FPR和TPR的值,将它们画在ROC曲线的结果如下图:


当我们将threshold设置为1和0时,分别可以得到ROC曲线上的(0,0)和(1,1)两个点。将这些(FPR,TPR)对连接起来,就得到了ROC曲线。当threshold取值越多,ROC曲线越平滑。

其实,我们并不一定要得到每个测试样本是正样本的概率值,只要得到这个分类器对该测试样本的“评分值”即可(评分值并不一定在(0,1)区间)。评分越高,表示分类器越肯定地认为这个测试样本是正样本,而且同时使用各个评分值作为threshold。我认为将评分值转化为概率更易于理解一些。

为什么使用ROC曲线
既然已经这么多评价标准,为什么还要使用ROC和AUC呢?因为ROC曲线有个很好的特性:当测试集中的正负样本的分布变化的时候,ROC曲线能够保持不变。在实际的数据集中经常会出现类不平衡(class imbalance)现象,即负样本比正样本多很多(或者相反),而且测试数据中的正负样本的分布也可能随着时间变化。下图是ROC曲线和Precision-Recall曲线5的对比:

AUC(Area Under Curve)

AUC被定义为ROC曲线下的面积,显然这个面积的数值不会大于1。又由于ROC曲线一般都处于y=x这条直线的上方,所以AUC的取值范围在0.5和1之间。
根据(Fawcett, 2006),AUC的值的含义[^FAWCETT2006]是:

The AUC value is equivalent to the probability that a randomly chosen positive example is ranked higher than a randomly chosen negative example.

什么意思呢?随机挑选一个正样本和一个负样本,根据当前的分类算法,计算得到两个样本的Score值。正样本得分比负样本得分高的概率就是AUC值。
简单说:AUC值越大的分类器,正确率越高[^AUC&ROC]。
分析一下:
(1) AUC=1,完美分类器,采用这个预测模型时,不管设定什么阈值都能得出完美预测。绝大多数预测的场合,不存在完美分类器。
(2) 0.5 < AUC < 1,优于随机猜测。这个分类器(模型)妥善设定阈值的话,能有预测价值。
(3) AUC=0.5,跟随机猜测一样(例:丢铜板),模型没有预测价值。
(4) AUC<0.5,比随机猜测还差;但只要总是反预测而行,就优于随机猜测,因此不存在 AUC<0.5 的情况。

使用AUC值作为评价标准是因为很多时候ROC曲线并不能清晰的说明哪个分类器的效果更好,而作为一个数值,对应AUC更大的分类器效果更好。

在了解了ROC曲线的构造过程后,编写代码实现并不是一件困难的事情。相比自己编写代码,有时候阅读其他人的代码收获更多,当然过程也更痛苦些。在此推荐scikit-learn中关于计算AUC的代码。

在上图中,(a)和(c)为ROC曲线,(b)和(d)为Precision-Recall曲线。(a)和(b)展示的是分类其在原始测试集(正负样本分布平衡)的结果,(c)和(d)是将测试集中负样本的数量增加到原来的10倍后,分类器的结果。可以明显的看出,ROC曲线基本保持原貌,而Precision-Recall曲线则变化较大。

说明,文中除了第一张图来自Wikipedia外,其他的图都来自论文(Fawcett, 2006)6截图.

引用及其他链接:

维基百科中对ROC的介绍: http://en.wikipedia.org/wiki/Receiver_operating_characteristic
ROC曲线及AUC评价指标 by 冒泡的崔:http://bubblexc.com/y2011/148/
我避免将precision,recall等评价指标翻译成中文,因为它们可能对应多个中文解释,极易产生混淆。 ↩

图片来源:http://en.wikipedia.org/wiki/File:Roccurves.png ↩

这种映射不一定都是可靠的,即你不一定真的得到了某个样本是正样本的概率。 ↩

注意这里使用了“Score”,而不是概率,我们暂且可以认为“Score”值就是是正样本的概率。 ↩

Davis, J., & Goadrich, M. (2006, June). The relationship between Precision-Recall and ROC curves. In Proceedings of the 23rd international conference on Machine learning (pp. 233-240). ACM. ↩

[^FAWCETT2006]:Fawcett, T. (2006). An introduction to ROC analysis. Pattern recognition letters, 27(8), 861-874

[^AUC&ROC]: AUC与ROC - 衡量分类器的好坏。

Install-third-party-library-in-Visual-Studio

发表于 2018-09-13

当前真是一个开源的时代,有很多很棒的第三方库都实现了开源,比如计算机视觉领域有名的就有OpenCV、VTK、OptiX、caffe、caffe2。这些库因为都跟计算机图形、图像数据处理相关,计算耗时,需要考虑代码运行效率,源代码多采用C、C++编写。而且考虑到跨平台使用,源代码需采用make的方式编译和安装。就是说make可以检测当前编译安装平台类型,自动将源代码build成适宜的库文件,并安装到相应的目录。例如在Windows平台,就编译连接生成lib、dll,加上必要的头文件,默认安装到C:\Program Files。在LINUX平台,就编译链接生成SO文件,默认安装到/user/lib。有了这些安装后的库文件,开发者才可以调用里面的类、函数做符合特定业务逻辑的事情。一般来说,这些库的源码在设计和实现时,都考虑到使用者可能擅长不同的开发语言,因此在源码中不仅实现了库中必须的类和功能,还提供了其他开发语言接口。比如caffe,虽然功能代码是用C和C++写的,但提供了matlab和python接口,开发者可以使用这两种语言调用其功能。当然C++和C语言也是可以的。本文主要讲述这种第三方库如何在windows平台下,使用VC++建立project,调用库中的功能。

下载

一般来说,这种用户数量大的第三方库都做得非常规范,既可以选择二进制安装,也可以选择源码安装。所谓二进制安装,就是给你提供了exe形式的installer,跟安装普通的软件没什么区别。不过一般建议用源码安装,因为遇到稍微复杂点的error,你可以跟踪进源码内部,看看到底是哪里出了问题。另外源码安装可以根据你的开发平台,生成完全匹配的LIB和DLL,我想更稳健吧。

cmake

cmake就是根据你的源码,以及附带的CMakeLists.txt,进行configuration和generation。configuration给你一些生成solution的选择,比如要不要生成examples,要不要生成shared library,要不要指定安装目录路径等,你因该根据你的需求选择。configuration OK后就进行generation。如果都没问题就在你选择的binary library的路径下生成了一个VS的sln。

compile

打开这个sln,一般都发现这是一个庞大的solution,包含几十个project,其中一般都有ALL_BUILD,ZERO_CHECK,INSTALL这三个project,除此外才是核心的功能代码。没甚说的,build啦。记住,一般选择debug和release两个版本。此外,你还需注意,你到底是要生成win32还是x64平台下的库文件。

安装

选择其中的INSTALL工程,右键project only->build only INSTALL,VS自动把开发需要的include,lib,bin这些必要的文件拷贝到cmake阶段configuration设置的安装路径。

开发配置

新建一个VS工程,要调用刚安装的第三方库,还需要做必要的配置。一般,在选择project名字,右键属性,设置以下四步,包括:

设置头文件路径

要调用第三库功能,必然需要包含其库中头文件。工程中一般直接include头文件文件名,不使用全路径。因此,为了告诉VS编译时,到哪里去找这个文件,需要设置projec属性中的VC++ Directories->Include Directories,包含第三方库安装路径中的include文件夹。

设置库文件路径

要调用第三库功能,必然需要链接调用其库中库文件。工程属性中第三库库文件一般通过导入additional dependices,添加要导入的库文件。同上,添加库文件一般只给出短文件名,为了告诉VS链接时到哪里去找库文件,需要设置projec属性中的VC++ Directories->Library Directories,设置第三方库安装路径中的Lib文件夹。

设置要导入的库

上述第二步只是告诉了VS到哪里去找库,找哪些库,也就是你要导入哪些库,需要根据你程序功能设置。linker-input->additional dependices。添加你要导入的库,你如果不知道如何选择,直接导入第三库中所有的LIB文件。
TIPS:命令行使用DIR *.lib /B 列出所有的库文件,拷贝添加。

设置环境变量

你的工程可能使用的是共享库,因此真正的库执行文件在DLL,也就是第三方库安装路径下的BIN中的DLL文件。你可以将所有DLL拷贝到你工程的EXE程序所在的文件夹(比如DEBUG,RELEASE),但设置环境变量是为了让你生成的所有的应用程序都可以找到DLL所在的文件夹。

至此,第三方库,编译、安装和开发设置完毕。

Install-pytorch-and-detectron-on-ubuntu-16-04

发表于 2018-09-13

1. dual OS:windows 10 and ubuntu 16.04

(1) install windows 10 firstly

(2) install ubuntu 16.04.03

disk partition:/boot,500MB,logic,ext4; /, 1000000MB, logic,ext4; swap,logic, swap, the left

  • note:
    If you want to uninstall or reinstall your ubuntu in dual OS platform, please use easyUEFI kit delete ubuntu os in windows platform and then delete ubuntu volumes using disk management.

2. some configurations in ubuntu

2.1 change pawss word.

ubuntu ask you using longer password when you install it. Maybe you want to change a shorter pass word at the sake of convinence.

sudo passwd username

2.2 adjust the of grub.

The font of grub will be very small if your display is a high definition screen. You have two choices to change it. One is to unsample the grub resolution, the other is using bigger grub font. I think the later is better.

(1) unsample the grub resolution.

  • to watch which resolutions are supported:press �c� key when grub menu is displayed; videoinfo; record which resolutions are supported in grub and select what you want.
  • edit “ /etc/default/grub” line : “ #GRUB_GFXMODE=640x480 “ to match ( removing the starting comment character) . 800 * 600 is OK
  • sudo update-grub

(2) change grub font size.

  • sudo grub-mkfont --output=/boot/grub/fonts/DejaVuSansMono36.pf2 --size=36 /usr/share/fonts/truetype/dejavu/DejaVuSansMono.ttf
  • sudo gedit etc/default/grub, add code below on the last line
# More readable font on high dpi screen, generated with
# sudo grub-mkfont --output=/boot/grub/fonts/DejaVuSansMono36.pf2 \
#    --size=36 /usr/share/fonts/truetype/dejavu/DejaVuSansMono.ttf
GRUB_FONT=/boot/grub/fonts/DejaVuSansMono36.pf2
  • sudo update-grub

2.3 Change console font size:With HiDPI display you may find your console font size is too small.

To change it:

  • $ sudo dpkg-reconfigure console-setup
    Encoding: UTF-8
    Character set: . Combined - Latin; Slavic Cyrillic; Greek
    Font: Terminus
    Font size: 14x28 (framebuffer only) or the even bigger

###2.4 Install google pinyin in Ubuntu 16.04

  • Command line: sudo apt-get install fcitx-googlepinyin
  • System settings -> Language support -> Keyboard input method system, change to fcitx.
  • Log out log in
  • At top right, click the penguin icon -> Text entry setting
  • Click +
  • Search �Google�, find �Google Pinyin (Fcitx)�
  • Use �Ctrl+space� to switch between input methods

###2.5 update and upgrade ubuntu1604

sudo apt-get update
sudo apt-get upgrade

###2.6 Dual graphic card problem.
You often have two graphic cards, one is integrated and the other is standalone. You can designate use standalone nvidia graphic card in bios settings. But I don�t suggest to do it. Because your computer will often fan speed the the noise of fan will annoy you. In default, ubuntu uses integrated graphic card. To change it:

  • Additional drivers. Using nvidia binary driver-version nvidia 384.130 from nvidia 384(proprietary, tested); apply; restart;
  • nvidai-smi
  • nvidia-settrings
  • note: Don’t use the latest nvidia driver, e.g. nvidia 390.77. Some instruction about installing nvidia driver suggest to update nvidia driver by using the latest runfile, but I found it will lead that you have not PRIME Profiles item in your nvidia settings UI. So you can not select which card you want to use.

###2.7 install cuda and cudNN.
I think the latest cuda tool kit have some tiny problems about caffe2 and detectron. So I select the 8.0.61 cuda version and cudNN 6.0.21 which is also tested and suggested by the authors od detectron.

(a)Install cuda 8.0

  • [ ] Download cuda 8.0.61_375.26 and its patch https://developer.nvidia.com/compute/cuda/8.0/Prod2/local_installers/cuda_8.0.61_375.26_linux-run
    https://developer.nvidia.com/compute/cuda/8.0/Prod2/patches/2/cuda_8.0.61.2_linux-run

  • [ ] cd Downloads && chmod a+x cuda_8.0.61_375.26_linux.run

  • sudo ./cuda_8.0.61_375.26_linux.run �no-opengl-libs
    accept installation,not install driver,yes install tool kit, for intstalling to default directory,yes for create soft link and not copy samples
  • [ ] sudo gedit ~/.bashrc
    Add these lines at the bottom of the textexport.Some paths set for incoming installation of pytorch, detectron

    'PATH=/usr/local/cuda/bin${PATH:+:${PATH}}
    

    export PYTHONPATH=/usr/local:/home/lxn/pytorch/build${PYTHONPATH:+:${PYTHONPATH}}
    export LD_LIBRARY_PATH=/usr/local/cuda/lib64:/usr/local/lib:/home/lxn/pytorch/torch/lib${LD_LIBRARY_PATH:+:${LD_LIBRARY_PATH}}

    export COCOAPI=/home/lxn/cocoapi
    export DETECTRON=/home/lxn/detectron'
    
  • [ ] source ~/.bashrc

(b)install cuda 8.0 patch 2

  • cd ~/Downloads && chmod a+x cuda_8.0.61.2_linux.run
  • sudo ./cuda_8.0.61.2_lin ux.run

(c) install cudNN

  • downloaded cudnn 6.0, https://developer.nvidia.com/compute/machine-learning/cudnn/secure/v6/prod/8.0_20170307/cudnn-8.0-linux-x64-v6.0-tgz
  • cd ~/Downloads && sudo tar -xzf cudnn-8.0-linux-x64-v6.0.tgz -C /usr/local
  • sudo ldconfig

(d) validate the installation:

  • check nvcc version:nvcc -V, you can get �Cuda compilation tools, release 8.0, V8.0.61�
  • check cuda version:cat /usr/local/cuda/version.txt, you will get message �CUDA Version 8.0.61,CUDA Patch Version 8.0.61.2�
  • check cudNN version:cat /usr/local/cuda/include/cudnn.h | grep CUDNN_MAJOR -A 2
  • CUDA Sample Testing
    • testing deviceQuery:
      ? cd /usr/local/cuda-8.0/samples/1_Utilities/deviceQuery
      ? sudo make
      ? ./deviceQuery
    • testing bandwidthTest:
      ? cd ../bandwidthTest
      ? sudo make
      ? ./bandwidthTest

If both of the tests return Result = PASS,it shows cuda installation succeed.

2.8 install pytorch**

  • [ ] Install Dependencies

    sudo apt-get update
    sudo apt-get install -y --no-install-recommends \
      build-essential \
      cmake \
      git \
      libgoogle-glog-dev \
      libgtest-dev \
      libiomp-dev \
      libleveldb-dev \
      liblmdb-dev \
      libopencv-dev \
      libopenmpi-dev \
      libsnappy-dev \
      libprotobuf-dev \
      openmpi-bin \
      openmpi-doc \
      protobuf-compiler \
      python-dev \
      python-pip                          
    

    pip install –user \

    future \
    numpy \
    protobuf
    

    sudo apt-get install -y –no-install-recommends libgflags-dev

  • [ ] git clone https://github.com/pytorch/pytorch.git && cd pytorch

  • git submodule update –init �recursive
    note: On current(August 29,2018), I found the latest version of pytorch will incur some troubles in compile process, So I used a historic version v0.4.1
    ? git tag(show all the tags of pytorch)
    ? git show v0.4.1(get the commit:a24163a95edb193ff7b06e98cd69bf7cfd4c0d2f)
    ? git reset –hard a24163a
    � FULL_CAFFE2=1 python setup.py install –user
    • note:
      The steps are copied from the official website of caffe2.But in practice, there are some tiny and noisy problems when you set up caffe2 at last. It maybe involve belows:
      (a) when pip install –user future, maybe need:
      ? pip install –upgrade –user setuptools
      ? pip install –user wheel
      (b) when build caffe2, maybe need:
      ? pip install –user pyyaml typing
      ? pip install –user hypothesis==3.40.0 (the version is important)
      ? pip install –user pydot graphviz

###2.9 install COCO API

$COCOAPI=/path/to/clone/cocoapi

git clone https://github.com/cocodataset/cocoapi.git $COCOAPI
cd $COCOAPI/PythonAPI

Install into global site-packages

make install

Alternatively, if you do not have permissions or prefer
to install the COCO API into global site-packages

python2 setup.py install --user
  • note: The last step may fails. The main reason is the version of pip and location. You should:
    � pip install –user Cython
    � sudo apt-get remove python-pip
    � pip install –user –upgrade pip
    � pip install –user pip
    � pip install –upgrade –user setuptools
    delete matplotlib and reinstall matplotlib==2.2.3
    � sudo apt-get remove –purge python-matplotlib
    � pip install numpy �user
    � pip install scipy �user
    � pip install matplotlib==2.2.3 �user

###2.10 install detectron

  • [ ] Clone the Detectron repository:

    DETECTRON=/path/to/clone/detectron

    git clone https://github.com/facebookresearch/detectron $DETECTRON

  • [ ] Install Python dependencies:

    pip install -r $DETECTRON/requirements.txt

  • [ ] Set up Python modules:

    cd $DETECTRON && make

  • [ ] Check that Detectron tests pass (e.g. for SpatialNarrowAsOp test):

    python2 $DETECTRON/detectron/tests/test_spatial_narrow_as_op.py

  • [ ] infer

    python2 tools/infer_simple.py \

    --cfg configs/12_2017_baselines/e2e_mask_rcnn_R-101-FPN_2x.yaml \
    --output-dir /tmp/detectron-visualizations \
    --image-ext jpg \
    --wts https://s3-us-west-2.amazonaws.com/detectron/35861858/12_2017_baselines/e2e_mask_rcnn_R-101-FPN_2x.yaml.02_32_51.SgT4y1cO/output/train/coco_2014_train:coco_2014_valminusminival/generalized_rcnn/model_final.pkl \
    demo
    
  • note: 4G GRAM sometimes is insufficient, You can use command to show the usage of GRAM:watch -n 1 nvidia-smi. But The best way is run infer process in tty.

Hello World

发表于 2018-09-13

Welcome to Hexo! This is your very first post. Check documentation for more info. If you get any problems when using Hexo, you can find the answer in troubleshooting or you can ask me on GitHub.

Quick Start

Create a new post

1
$ hexo new "My New Post"

More info: Writing

Run server

1
$ hexo server

More info: Server

Generate static files

1
$ hexo generate

More info: Generating

Deploy to remote sites

1
$ hexo deploy

More info: Deployment

James LEE

4 日志
© 2018 James LEE
由 Hexo 强力驱动
|
主题 — NexT.Muse v5.1.4